Tasks management
The first option in PhpReport top menu points to the task management screen. In this screen, users will be able to fill in their tasks, modify or delete them.

The tasks management screen
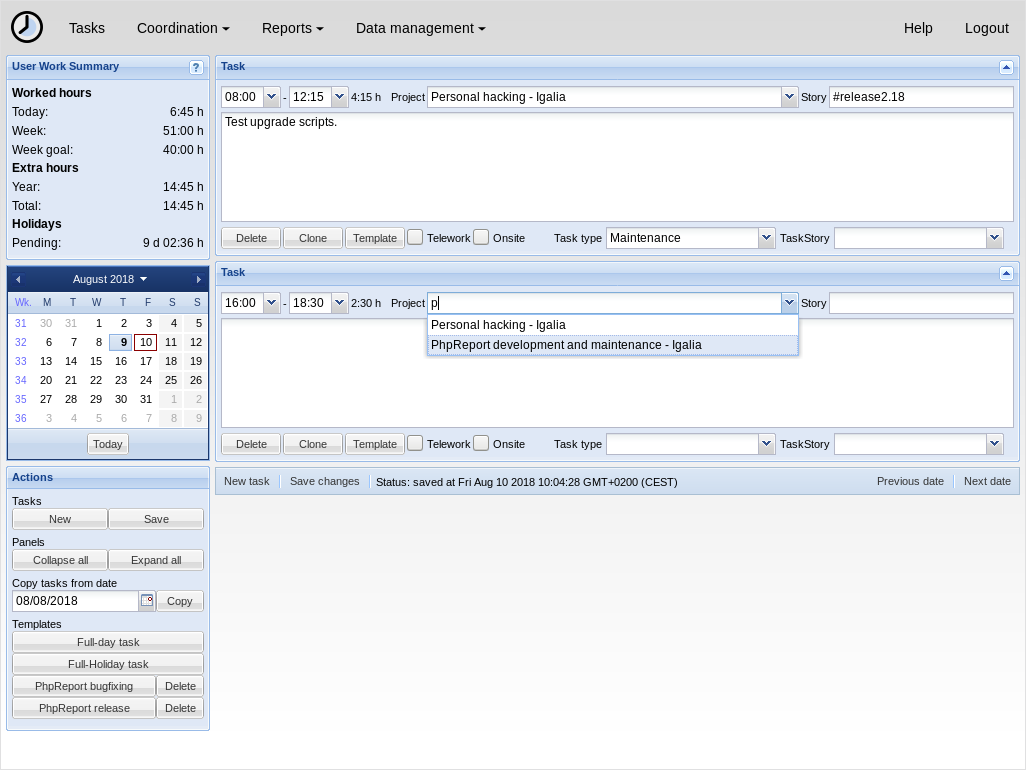
In the left column, you can find:
- User work summary: contains useful information about the user work status.
- Calendar: indicates the selected date and you can click on it to go to a different date.
- Actions: create new task and save changes, expand and collapse all the panels, copy tasks from another date and use templates.
In the central area, you will see the tasks stored in the currently selected date, one panel per task. All panels have the same components, some are used to fill the information about the task:
- Time: fill the start and end dates in.
- Project: project the task belongs to. You may search by the project or the customer name, users will only see projects they are assigned to.
- Story: you can fill this field with a keyword to help you to differentiate tasks inside the same project.
- Description: the big text area in the center can be used to write a description of the task.
- Task type: select one of the types for additional info about the task.
- Telework: flag to differentiate telework tasks.
- Onsite: flag to differentiate on-site tasks.
Actions in task panels:
- Delete: delete the task. Remember to save to do the actual deletion.
- Clone: creates a new task with the same data and empty times.
- Template: create a template based on that task. See Using templates section below.
- Collapse: the arrow icon in the top-right corner collapses the panel; it's useful to save vertical space when there are many tasks.
Below the list of tasks in the central area, there are two additional buttons for New task and Save changes, for easy tab-navigation. There are another two quick-access buttons to the next and previous dates.
Managing tasks
When you open the screen, the current day will be selected; if you are about to fill tasks for a different date select it from the calendar on the left. Be careful, if there are unsaved changes, they will be lost when you select a different date.
Fill the data of the empty task that pops up by default, and add any number of new tasks using one of the two New task buttons. There are more ways to create new tasks: using the clone button in a different task, using a template button, or copying from another date. Repeat as many times as you want until you have filled all the tasks of the day, changes will be auto-saved every some seconds, there is a message in the bottom bar that will let you know.
You can delete a task pressing the Delete button inside the task panel; the panel disappears but the deletion won't be saved until you do it manually with any of the two Save buttons.
Be careful with the start and end times of the dates, because they can't overlap; if they do, tasks won't be saved until you correct the problem and save again.
Using templates
Templates are useful when you create tasks with very similar data very often. They are listed in the Templates section, in the bottom of the left column. To create a new task from a template, click on the button with the name of the template.
To add new templates to this list, first you have to create a task; fill it in with the data you want to save as a template --- any field can be saved, and none of them is compulsory; finally, click on the Template button in the task box. You will be asked to provide a name for the template, and when you confirm it will be added immediately to your templates deck on the left side.
To delete a template, you only have to press the Delete button right to the button with template name in the list.
There are two default templates that cannot be deleted:
- Full day task will create a task and set its start and end times so it fills one full day of work. The values will be set according to the users' journey values.
- Full-holiday task works like the previous one, but will also set the project field to 'Holidays'.
Copying tasks from another date
A common scenario is having a person working in the same tasks for some days, usually with the same timetable. The copy feature is useful in this case.
In the actions box from the left column, there is a section named 'Copy tasks from date' containing a date selector and a 'Copy' button. When you press that button, the tasks saved in the indicated date will be copied to the current date. Take into account that copied tasks aren't saved until you press the save button.
The default date to copy from is the last date containing any recorded tasks, that's the most common use case. Finally, we must clarify that copied tasks can be modified without affecting the original ones.
Blocked tasks
Sometimes users won't be able to modify or delete some saved tasks, nor even create new ones on certain dates. It can happen because of two reasons:
- Managers have closed a project. In that case, tasks assigned to that project cannot be altered.
- Managers have blocked task reports for the selected date. In this case, even the New task and Save changes buttons would be blocked.
User work summary
The User work summary panel on the left contains information on worked hours, extra hours and holidays. Figures are presented in days, hours and minutes, where a day is calculated based on the configured user journey; e.g. for a 8-hour journey, 44 hours is 5 days, 4 hours.
Worked hours, today:
: Number of hours worked today.
Worked hours, week:
: Number of hours worked this week.
Worked hours, week goal:
: Goal for the selected week.
By default, it represents **the number of hours users must work per
week to finish the year with zero accumulated hours in that
period**. To put in in a different way, they would finish the year
with the same number of historically accumulated extra hours they
began it.

For example, if you have worked some extra hours in the last weeks
the weekly goal will become lower than your weekly schedule. This
way you will have a way to know how to handle your time and finish
the year with zero accumulated hours.

This value is calculated taking into account the users' journey
values and the amount of worked hours so far. For users whose
contract period is shorter than the year in course because they
started or will finish working along the year, or because they
changed contract hours (journey value) in that period, the time
period will be constrained to the contract dates.

For example, if a person was working full time in the first half of
the year and part time in the second half, there will be different
\"weekly goal\" periods for each half of the year and they work
independently: the hours accumulated in the first half are not taken
into account in the second.

Managers can customize per-user weekly goals with other time periods
and amounts of hours different of zero. Read more about this in the
[Setting user custom
goals](users-management.md#setting-user-custom-goals) section.
Extra hours, year:
: Number of extra hours corresponding to the current year.
Extra hours, total:
: Number of historically accumulated extra hours.
Vacation days, available for year:
: Holidays available to be used this year.
Vacation days, used:
: Holidays already used in the year. More particularly, these are holidays saved for dates in the past.
Vacation days, scheduled:
: Holidays scheduled for later in the year. More particularly, these are holidays saved for dates in the future.
Vacation days, pending:
: Holidays pending to be scheduled or used. This is (holidays available − used − scheduled).
Hotkeys
Some hotkeys are available to increase the productivity for keyboard users:
CTRL + S
: Save changes. Some browsers don't allow to overwrite the behaviour of this key combination (e.g. Epiphany), so you can use ALT + S instead.
CTRL + N
: Create a new task. The cursor will be placed in the first field of the new task. Some browsers don't allow to overwrite the behaviour of this key combination (e.g. Chrome), so you can use ALT + N, CTRL + U or ALT + U instead.
ALT + SHIFT + number
: The cursor will be placed in the first field of the first, second, third, etc. task depending on the number you pressed.
TAB
: Advance to the next field.
SHIFT + TAB
: Go back to the previous field.
LEFT, RIGHT
: Jump to the previous or next date, when keyboard focus is not inside a field.