Projects management
PhpReport provides an interface to create, edit and remove projects, and assign them to users and clients. It can be accessed from the Data management menu, section Projects.

Create, edit and delete projects
In the Project management screen you will see a grid containing all the projects, sorted by start date by default; this can be changed pressing on the corresponding column.

To create a new project you must use the Add button located above the grid, and to edit a project you must double click on the corresponding row or click once to select it and then press the Edit button, also located above the grid.
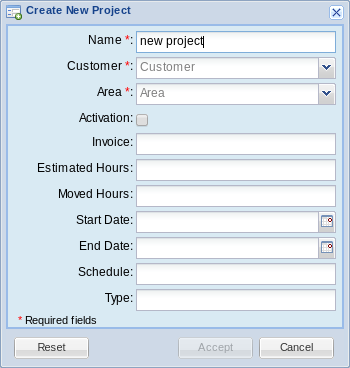
In both cases, the following subwindow will appear:

In the window you must enter the data of the project:
Name:
: Name of the project.
Customer:
: Customer the project will be assigned to.
Area:
: Area of the company this project belongs to.
Activation:
: Activation status of the project. If it's not active it doesn't appear in the tasks screen and no hours can be entered.
Invoice:
: Expected invoiced of the project.
Estimated hours:
: Number of hours expected to be devoted to the project.
Moved hours:
: Number of hours moved out of the project. The moved hours are not taken into account to calculate the deviation or the estimated invoice per hour.
Start date:
: Start date of the project.
End date:
: Theoretical end date of the project.
Schedule:
: Legacy field containing the type of schedule of the project. Now it can contain any text.
Type:
: Legacy field containing the type of the project. Now it can contain any text.
The Reset button allows you to to return the data in the window to the original state, while the Accept and Cancel buttons will save or discard your changes, respectively.
With the Delete button located above the projects grid you can remove the selected project. You will be asked for confirmation before actually trying to delete. If there are any assignations of tasks, clients or users to the project, you won't be allowed to delete it. You have to remove those assignations and try the deletion later.
Finally, the last button, Details, will open the project details report for the selected project.
Assigning users
To assign users to the selected project, press the Assign People button located above the projects grid. The following subwindow will appear:

To assign a user, you have to drag it from the right list and drop it on the left list. Only the users assigned to the area to which the project belongs are shown in the list by default; if you want to assign a user who's not in the list, check the Show all Users box.
Once you're done, press the Accept button to save the assignment or Cancel to discard it. You can also use the Reset button to return the data in the window to the original state.
::: tip ::: title Tip :::
You can select more than one user to drag'n'drop them at once, using the Ctrl or Shift keys. :::